GSXR Experiment Part II

Posted: April 12, 2012 in Uncategorized


So I got a good understanding of what worked and doesn’t work using GSXR TB’s.  The first iteration was with the 04-05 gixxer 600 TB’s (38mm) on modified type 4 fuel injection runners.  The design was flawed, but I still managed to make 35-40mpg on a recent trip!  The manifold design looked good on paper, but reality is cruel mistress and I had numerous problems sealing them to the TB’s and it didn’t take a lot to pop them off the mani’s.  The also had way to short intake length.  So back to the proverbial drawing board.


Version 2:

  • 06-07 GSXR 600 throttle bodies (40mm)
  • 03-04 GSXR 1000 #24 injectors
  • custom fuel rails, I made them 🙂
  • custom pulley (my buddy Devin on STF made it, it’s sexy)
  • idle set screw from a 00-03 gsxr 600 TB (I just happen to have it laying around)
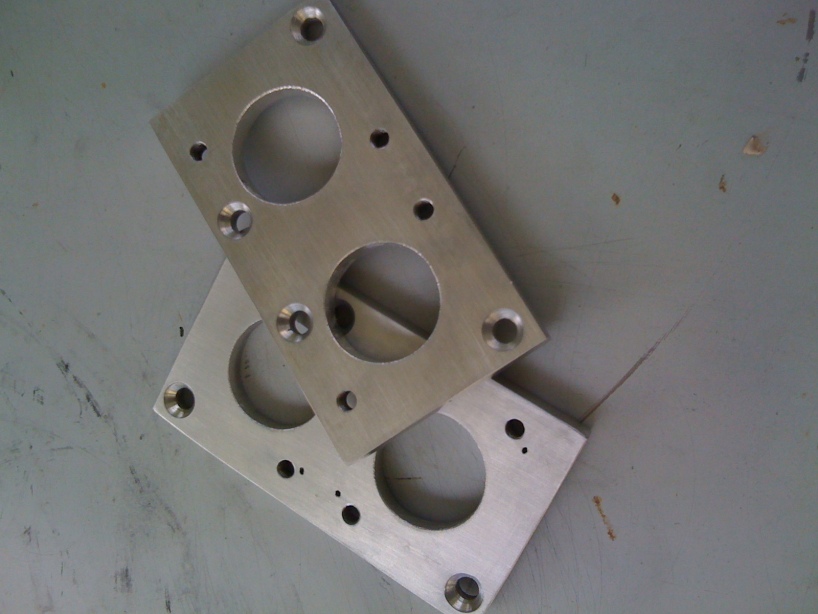
  • custom bolt plates between TB’s and IDF manifolds (one of the guys in the club made them on his CNC plasma cutter)
  • Spigot flanges (4), mates the TB’s to the bolt plate… KHS-004
  • modified Weber DCOE 45 velocity stacks (4), silicone couples and bolt clamps
  • fuel system is now all -6an, Performance Products FPR, black fittings, and black braided lines…sexy
  • reused my cable linkage, but made a new custom bracket for the right TB
  • some porting of the IDF mani’s and bolt plates

Sounds like a lot going on, but it was about a full days worth of work and it was for the most part all bolt together.  The big improvement on the design is use of the spigot flanges and bolt plates.  I get a real solid mount for the TB’s and it is fairly straightforward to mount to IDF manifolds, which also makes this setup universal for all the ACVW platforms both type 1 and type 4 engines.

Throttle bodies:

I am using the 06-07 TB’s which are basically a similar design to the 04-05 TB’s just a little bigger.  They also have 8 injectors instead of 4, so I had to plug 4 extra holes and I removed the extra rail mounts.  There is still the extra holes to fill for the servo choke plates.  The 04-05 TB’s use a progressive oblong pulley and the 06-07 TB’s use a round pulley.  Devastator on shoptalkforums CNC machined me a very nice round pulley.  I “modified”, AKA chop sawed the return spring bracket behind the pulley.  That was one issue I didn’t get right on the 04-05 TB’s and had to use a extra spring.  No extra sping on this version.  I also didn’t like idle set screw I used on the first version.  This time around I set screw from a junk 00-03 TB that I pillaged a pulley from.  I had to get a oddball 5mm x .5 tap, mcmaster-carr to the rescue.  That turned out awesome, it looks completely factory…nice!

Bolt plates:

The big problem is the 75mm center to center of the gsxr 600 TB’s and 90mm center to center of the IDF mani’s.  The bolt plates are 3/8″ so there is room to do some porting.  I only did a light porting to smooth the transition.  There is still plenty of meat on the mani’s if I want to try and make a straight shot for the air.  I’m trying to create some turbulence to see if I can get better atomization and vacuum.  Seems to be working, I have more vacuum at idle and in cruise, but WOT I’m seeing atmosphere.  I also make some paper gaskets for between the heads and mani, and bolt plates and manifolds.  I went with a fancy hardware choice to mate everything up too.  I used SS flat head cap socket bolts for the bolt plates, and metric flanged button heads for the spigot flanges.  All are 8mm x 1.25, that’s the same size and pitch as the original studs on IDF mani’s.

Rails:

I could have just modified the metal rails that are stock on the 06-07 TB’s and used the original injectors but I have a set of gixxer 1000 injectors that I have been wanting to run.  The 04-05 and 06-07 TB’s use injectors with 11mm inlets.  the 03-04 1000 injectors and most cars use 14mm inlets so now I have a lot more injector options.  Also the 600 injectors are #18 and the 1000’s are #24, I have been wanting to try out e85, I now have plenty of inj overhead to mess with ethanol.  The rails are extruded aluminum from RMR, I got it from their ebay store.  It was $5 a foot because it was supposedly damaged, even though it looks fine to me.  I used this to machine the rails for the inj http://www.rossmachineracing.com/injectortool.html a bit pricey but it does a fine job.  The plan was to use -6an, so I used a 9/16-18NF tap on the inlet/outlet of the rails.  There is supposed to be a grove machined for the oring AN fittings, I didn’t want to pay $300 for that so I just JB welded the fittings on.  That is ghetto but it works well.  The last step was to make a bracket to mount the rail to the TB, unfortunately the 06-07 TB’s only have one mounting boss per TB, so the mounting bracket has to be perfect or a car-b-que can result.  When everything was done, I cleaned the rails up on my drill press using scotch pads, the result was a nice brushed finish.

Overall impression:

The longer intake run and the bigger bore creates a sexy growl when I’m on it.  I cruise and idle with more vacuum now, so much so I re-indexed all my maps to take advantage of it.  I haven’t taken it on any big trips yet but I expect the same or better mileage.  I do have a lot smoother midrange and did not lose any throttle response.  The verdict so far is this version is all win.  I have a long trip in another week of so, I’ll use my GPS to try and get a accurate mpg.

Here is a fun little video, that’s about 20 minutes of tuning http://www.youtube.com/watch?v=Mp4p3V3jKoA

This slideshow requires JavaScript.


IMG_1112

Image  —  Posted: April 9, 2012 in Uncategorized

Shift Right!

Posted: September 29, 2011 in Uncategorized


I got over 3500 miles on the engine now, and I think I figured out of couple issues and I got a solid plan of action.  It’s time to shift my focus to the wheels, brakes, and suspension.  I am about half way through the acquisition stage and I have a good idea how I plan to do this.  I’m also at the point of no return with the direction that I am taking this car.  The direction is a no brainer since I have huge hard-on for German Look Volkswagens.   Since I’m on a bit of a budget I get to be very “creative”, I heart a good challenge.  The timing is right as well.  In a couple of weeks I plan on parking the car for winter and pulling the body off to address the 2 cancer spots, sunroof clip install, and replace the front and rear clips.  I’m going to make some room for a AC compressor too.

Here’s the plan:

7×17 twists all around 205/45 front and 215/45 rear

Mercedes ML430 front calipers on 928 s4 rotors

944 aluminum control arms

944T calipers and rotors on the rear

944 s2 24.5mm torsion bars

IRS subframe

091 gear box


I’ve done a mock up of with the wheels on it, I got plenty of room…maybe a cunt hair of room, lol.  I also measured out the front.  It looks like my fronts are only going to be pushed out a couple of mm’s, the back is getting pushed out 3/4″ per side, that’s from the control arms.  Unless my math is wrong that should work.


To make the front rotors and calipers mate to the spindles I’m thinking the easiest way will be to machine t3 disc’s into hubs, drill and press in some studs and call it a day.  Then make a bracket for the monstrous calipers.  I’ll have to mock up everything first to be able to get a accurate measurement for the brackets, should be very simple.  Also those calipers will sit about 3-4mm from the tie rods, it’s close but it should work.


Ya I know it’s overkill but I already have the ml430 calipers so I gotta work with what I got.  BTW I have never seen Porsche parts so friggin cheap on garbay, yay me.  I need the car back together and sorted out before the Type 3 Invasion, which is June 21-24.  That’s just shy of 9 months, I think that will be doable.  Maybe I’ll squirt some paint on the notch too 😉  Stay tuned a lot of awesomeness is about to happen.

The Intro-

I got some miles under my belt and a couple of issues have crept up, but overall it runs good, 30-35mpg (I still need to use my GPS and figure out exactly what my mileage is), the TB’s have not left me stranded (the tranny is another story grrrrrrr), and I think I have sorted my tune for the most part.  This blog is going to A/V rich, I have lots of pics, a few screen shots of my tune, and a in-car vid so enjoy.

Issues-

I don’t want to call it a design flaw but the manifolds are a flawed design….with silicone couplers.  I have had numerous times that the TB’s partially popped out and numerous times that the silicon couplers have torn.  I bought a set from a different company and had the same results.  Well my notch is now sponsored by home depot racing, lolololol, just kidding.  Seriously, I went to lowes and got some pcv couplers that were somewhat the right size, cut them to the length I wanted and have been running them.  So far so good, and I suspect they will be just fine.  Hopefully that issue is solved.


Number 2, would be the tune.  I tried using Alpha-N and that never worked as good as Speed Density.  So I went back to Speed Density, got “creative” with the map indexing, and added a 500mL bottle in the vacuum circuit.  It’s working friggin awesome, when I romp on it I got 12.5 AFR and when i’m cruising I got 14.7-15.0, perfect!  The creative indexing makes a night and day difference, changing tune to match my engine is a lot easier then the other way around.

Idle, sweet idle.  We got a love-hate relationship.  This issue is just messing with my insanity, so I have settled on a 1100 rpm idle, and that seems to be the sweet spot.  Anything lower and it gets chunky.  I right now got the cranking trim dialed in to be able to fire up with my foot off the pedal but it’s chunky until i work the throttle and keep give it a little gas till it’s warmed up.  I’m pretty sure it’s just a after start enrichment issue, gotta keep playing with it.

Improvements?

What would I do differently if I were to do it all over again?  Instead of using t4 fi mani’s and clamp/coupler method I think modified IDF mani’s and flange spigots would be much more elegant.  Either cutting off the flanges and moving them to the correct center to center distance or cutting them off and using weld plates.  I could shorten the shit out of some IDF mani’s for my type 3 engine bay doing it that way too, or leave then long for type 1/2/4/914 setups.  Type 1 IDF mani’s would be difficult to shorten since the ports are so damn close.  I’m just thinking out loud, it looks like version 1 setup has become a winner.

The outro-

So I’m finally happy with my engine, fuel system upgrade is on the plate and then ethanol tune.  May or may not happen right away.  There is a big VW show in Austin in the begining of October.  That will be the first long trip for the notch (I think it’s about 200+ miles away).  A great oppurtunity to use the gps and get a accurate mpg calculation, should be interesting.  I’m going to leave you with a little in-car vid, till next time…same bat channel, same bat station!

Here’s the update:  They friggin work!  I did get them to run alright with some modifications to the KPa indexing on my fuel/timing maps but I decided to ditch the speed density tune and go with a alpha-N tune.  I’m still sorting it.  I also am going to add a GSXR idle solenoid and use the MSextra closed loop idle function, I just bought the electronic components needed to make that work.

So far my impression is that everything improved- idle, mid range, top end, throttle response, sound…everything.  Idle ain’t perfect and thats why I want to add the solenoid, then it should be perfection.

this blog post is going to be about all the goodies I had to get, where I got them, and how much for my particular setup.

ITB’s

Ignition

Management

  • MS1 v3.00 unassembled kit $200 http://www.diyautotune.com/catalog/megasquirti-programmable-efi-system-pcb30-kit-black-case-p-108.html
  • 12′ harness from DIYautotune $69
  • walbro w/ install kit $115 from DIYautotune
  • GM IAT sensor/pigtail, DIY $17
  • Coolant temp sender, Bosch Ljet..free came on my core motor 😉
  • 5.75″ 36-1 trigger wheel with a 1.5″ center hole $37 shipped from ebay
  • 89 Ford mustang VR sensor w/ pigtail $10 ebay (same exact pigtail as the COPs)
  • AEM UEGO wideband 30-4100 $180
  • 3 relays, fuse block, terminal strip, mounting board, MSD vibration mounts, harness material, vac line, wire, shrink tubing, zip ties, ect…$100-150ish
  • 5/16″ fuel line, Jegs 25′ for $17
  • fuel return bung welded onto the fuel tank local $20
  • header was used and already had a bung on it…free 😉
  • FPR bosch Ljet, was on the core motor…free 😉
  • fuel filter, summit racing $12
  • MSextra firmware…free;)
  • Tuner Studio registered copy…$40 and well forth it for the VE Auto Tune function

Grand total is $1255.  Thats not bad at all considering CB wants $1800 for their EFI kit(they don’t have a distributorless ignition system either), and I have seen ITB’s that bolt onto IDF manis go for $2000 just for the throttle bodies.  I am considering upgrading to MS2 and going full sequential, that will add even more throttle response to my setup.

That’s all I got for now, next post will include updates on the alpha-N tune and how that idle solenoid worked out…stay tuned.


First thing first, this setup has not been installed/tested yet.  It is right now still in the concept/R&D stage, but things are really looking good.  Whith that being said, I am going to open with all the info I have on it.  That’s what blogs are all about, free knowledge.

Why crotch rocket TB’s Supa?

Three reasons:

  1. My notchback’s engine compartment is very much vertically challenged, none, and I mean none of the off the shelf aftermarket will fit under the engine lid.
  2. With my type 4 cam selection, I need ITB’s to get the idle down.  The stock Ljet setup does work, but I’m expecting this setup to work better.  Also this opens a whole new world of modern injector options.
  3. The final and most important reason…$$$.  I’m a starving college student, I can not afford a $2000 EFI setup to upgrade the setup I already have, on the other hand, I can afford a $300 setup.

That’s right, I’m into this deal about $300.  That involved some exhaustive ebay searches, with some ninja-like bidding.

  • 04-05 GSXR 600 throttle bodies $30
  • 04-05 GSXR 600 complete wire harness(even came with COPs, friggin score) $27
  • (2) K&N R-2300 airfilters $70
  • (2) type 4 FI intake runners, free (they were spares I had laying around)
  • Cable linkage $100
  • 1.75″ silicone couplers, and t-bolt clamps, $20
  • (4) 10mm freeze plugs, $4
  • (4) 5/16″ hose barb fittings, $20ish
  • machine work…I owe my boy Eric big time!  He can do more for $150.

I reused/modified the stock composite fuel rails.  Involved some drilling, dremeling, tapping, and jb welding.  One day I’ll have some more attractie ones made so I can run AN fittings and braided line.

A gixxer motor is a inline 4, their TB are 2 double TB’s bolted together.  First step is to remove the choke plates, then pull the shaft out.  Unbolt the 2 bolts that hold the TB’s together.

The mani’s required extra milling to shorten them as much as possible.  He also opened up the insides a bit on the mill.  Eric put some steel piping on the lathe and turned it till the ID/OD matched the TB’s.  He machined the end castings down almost .500″, and welded the .500″ pieces of piping after we lined them up with the TB’s.  The end castings are cast steel, so he had to TIG weld with rod then let them slow cool in a bucket of sand.  Afterwards we trued up the head mating surface on a ultra flat piece of granite with 150 grit sandpaper.  They turned out friggin awesome, better then I imagined.  All thats left on the mani’s is to put 10mm freeze plugs into the factory inj holes.

I attached the TB’s to the mani’s with 1.75″ silicone couplers that I cut down to about 21mm, then used 1 t-bolt clamp per cylinder.  With the nearly identical OD’s of the TB’s and mani’s that won’t be a problem at all for sealing, plus with t-bolt clamps you can crank them down pretty good.

Filter selection for me is quite limited, I crunched the numbers and it turned out 3″ is all the overhead I have for a filter.  K&N has a nice 4″ one but it’s too tall.  They also have a 1.75″ one that will fit the TB’s perfectly but I don’t like the idea of a short air filter choking off my 2L.  So I gambled on a 78mm center to center 3″ tall fitler.  My hunch that the 3mm can be taken up with the clamps was right on the money.  They fit perfect on the TB’s.

The linkage is going to be a cable pull-pull type.  I searched around for custom made ones, and even tried to get ahold of a VW guy that makes a slick setup for Dells and Webers but he must not be interested in doing some experimental stuff, his loss my gain.  The custom ones seemed a bit pricey and most just were not properly suited for my application.  I got learned on how to assemble a cable myself and found a aircraft supply company that had most of the fittings that I needed.  I found a racing company for the rest.  I trial fitted everthing and it is all spot on, going to be very professional looking, and most importantly, fully functional.

There is still a few more things that need to be done to the TB’s so they can work as 2 seperate units.  One of the TB’s does not have a WOT stop or a idle adjust (thats needed for syncing them in).  no big deal, i used a well placed pin for the WOT stop.  The idle adjust screw just required a hole drilled and tapped and knurl topped screw with a spring, about $2 at the hardware store.  there was even a boss cast into the TB for the idle adjust, lol.  Sorry no pics on that.  The final thing is the holes for the choke shaft need to be plugged.  I used some 1/4″ aluminum rod and jb weld for that.  After cutting all the parts and cleaning up the cuts on the belt sander and gluing them in.  I went over it with a small sander and got them all nice and flush.  Once again no pics.

The injector angle is not absolutely ideal, I have a feeling cold starts are going to suck balls.  That pic above is what the intake valve will see.

A couple of interesting observations, these things did come with a TPS, thats good.  I can mount a IAT sensor on the bottom of one of the air cleaners.  I think I will have about a 1/4″ of overhead, it is going to be close.  From what I can tell the injectors are 185cc (same size I have in there now), I’ll find out after I fire it up with them.  My cable setup is going to replace the stock cable but I’m going to have to run it outside of the tunnel, either that or else I have to put a bigger throttle tube inside the tunnel.  This car is not stock so I can care less about it.  That’s about it for now, after I get it installed and running I will make another blog…stay tuned, same bat time, same bat channel.

This blog post is all about the present. I’m going to list averything that I did to my type 4 2L, all the details of my megasquirt/ign setup and where I am at with this car. Bear in mind I bought the car just 9 months ago and it was just a shell of a notch and a truck load of parts and some blood, sweat, and tears plus lots of cash to get it where it is. The funny thing is i have no interior and need paint still, both of which are big dollar deals. Without further adue-

The heart of this build is the type 4 motor. When i got the car it came with a 1600 dp and a weber progressive, not only did it have a garbo carb but it also had a rod knock. That was all I needed to start a type 4 build. I found a complete type 4 w/FI in cali, had it shipped to Tejas for a few bills. The funny thing is a local had a complete type 4, and he wanted $1200 for but he had no idea if it ran. I guess peeps think their stuff is made out of gold.

  • Parts List:
  • GD 1977 2L, case was STD/STD and no syndrom
  • 71mm Crank, polished and balanced locally…STD/STD
  • rods, balanced to 1 gram of each other by me
  • Cam- Jake Raby 9530, modified cam gear, parkerized lifters, double throust cam gear(got a smoking deal on all of that)
  •  30mm mellings oil pump, I match ported the case for the pumps outlet
  • 200mm conversion flywheel, balanced, new stock pressure plate/clutch
  •  reringed stock pistons, honed the cylinders(had to replace one, it was pitted from standing water)
  • all new bearings
  • new oil pressure relief plunger from raby
  • longblock hardware kit from raby
  • german gasket kit
  • threaded case plugs
  • 1.7L heads bored to 94mm, new guides, seats, valves, 135lb springs, chromoly retainers, hardened keepers, lapped and valve job…Rimco did all of the work and it wasn’t cheap.
  • 1.7L rockers, I machined them .060″ thinner
  • actual 911 swivel adjusters, I machined them shorter
  • Raby solid rocker spacers, i had to machine them to fit
  • Raby hardened rocker studs
  • Chromoly pushrods, I set the valve train geometry
  • all the stock tin
  • rebuilt alternator, new belt, used regulator
  • new bosch automatic starter
  • 72-74 T2 heat exchangers, I removed all the aluminum
  • 72-74 header w/ O2 sensor bung
  • bugpack T2 muffler
  • 411/412 air duct

T2 L Jet fuel injection

  • 1.8L 914 plenum, doesn’t have all the internal crap for the egr and the one on the engine had gotten smashed beyond repair, made a blockoff plate for the cold start valve
  • AAV
  • T2 2L runners
  • L jet injectors, cleaned and flow tested…168cc @ 30psi, and 202cc @ 43,5psi
  • 2l T2 throttle body, modified to use a Ford Ranger TPS
  • L jet FPR
  • All the factory fuel rails, and 7mm braided fuel line, and german #13 clamps
  • Bosch cylinder heat temp sender

Mega Squirt 1 v3.0 fuel/ign…giggity

  • MSextra firmware
  • Tuner Studio software, registered version
  • Serial to USB cable, witha 6ft extension
  • premade wire harness
  • Walbro 255lph fuel pump, 3/8″ barbs, and noise insolated
  • trigger wheel w/Ford Mustang VR sensor
  • GM IAT sensor
  • Uni filter dual foam air filter
  • AEM UEGO WBO2 controller/gauge
  • Bosch BIP373 coil drivers (4), I put them in a seperate ign box
  • Constant Baro circuit
  • Tach driver circuit
  • Denso stick coils from a 07 Suzuki GSX-600r (use the same plugs from early 2000’s Ford)
  • Bosch 4001 super platinum plugs from a Mazda Miata, gapped to .044″, resistor type
  • Bung welded to the tank for the fuel return, tank was also sealed with POR15’s tank sealer
  • numerous relays, wire, fuses, shrink tubing, harness sheaths…
  • 47uF 25V cap on the input power to MS for noise supression

The motor build went pretty smoothly, I got most of my type 4 specific stuff from raby since he has every nut and bolt for these motors.  I tried to reuse as much of the stock stuff as I felt comfortable with.  Of course only stuff thats within specs.  The heads were a bit of a nightmare, but I eventually found a good set of 1.7’s in my home town, a good friend of mine, Wally, went and checked them out and said they looked awesome.  Then off to Rimco for the works, ya that was not cheap, no port and polishing or bigger valves.  The green baywindow Bentley came in very useful (its nice hardback book too).  Setting the valve train was a bitch but I took my time and got it right.  I used ZDDPlus break in paste and brad penn breakin oil.  My impression so far is that it exceeded my expectaions in the power department, I seemed to have used a good combo…giggity!

Megasquirt…I heart it, but it took me forever to get through my growing pains.  All of it was self induced, since I refused to follow simple directions.  I didn’t used to be like this, I must be getting cocky or something.  Anyways, fresh motor, new to me fuel injection management, plus ignition ….ya i’m a glutton for punishment.  Well I’m happy to report that i’m through most of the drama.

Here’s the drama that I went through:

VR sensor- had to figure out the correct polarity, then how to properly ground it.  I ended up putting the VR- to the cable shielding and also tied that to engine ground.

Injectors- They wouldn’t fire so I looked at the schematic and realised I left out about 4 components, derr herp herp.

Noise-  And lots of it, it was so bad at one point I had HV arching on socket to my laptop, yikes.  I moved the coil drivers to seperate box, then put resistor plugs in.  I still had an occasional reset at high rpms from the alternator.  I put a 47 uF 25v cap between the 12v into the megasquirt and gnd.  Noise is fixed.

doesn’t seem like a lot of drama but thats about 3 weeks of troubleshooting to solve all of that.

Here is my ignition setup, COPs wasted spark using a 36-1 trig wheel:

  • I got a set of denso stick coils off ebay for $10, 00-present I believe all will work
  • the connectors I’m using are these http://rjminjectiontech.com/collections/pigtails-connectors/products/cop1-con
  • Bosch BIP373 coil drivers, I got them from www.DIYautotune.com, they come with the correct Mica insulators.
  • I used (4) 660 ohm resistors
  • I put a DB15 plug where the LEDs
  • built a box with a huge heat sink for the drivers, cleaned up the inside of my MS, and I feel a lot better about getting all that HV out of the MS.
  • Bosch 4001 Miata resistor plugs ($13 from the local FLAPS)

To be able to use MS1 and direct fire ignition (no EDIS, MS is actually controlling the coils) I had to upgrade to MSextra firmware.  Fine with me extra has a ton of awesome features and the upgrade is free.  www.MSextra.com has all the nitty gritty details on all of the added features and how to wire up the coil drivers.  It says 330 ohm resistors but you need 660’s.  also you’ll beed to feed +12v to the other leg of the COPs.  I build a seperate 12v circuit for the ignition: relay triggered by the fuel pump relay(so the coils can sit there and fire if i leave the key in the on position).  14awg for all the high current lines and 20awg for the control wires.  GOOD GROUNDS!!!  I can’t stress that enough.  I also put a 5a fuse for each pair of coil drivers.  Just like bank firing the injectors your going to pair opposing cylinders.  for us ACVW peeps that means 1-3, and 2-4.

Crap my attention is waning so I’ll add some pics and call it done.  Next installment will be my plans for this car.  Same bat channel, same bat time!

Preamble

I am well aware there is a large population of type 3 enthusiasts who are absolute purists.  There is even a very exclusive club of these die hards to preserve the originality and correctness of early type 3’s, The 1500 Club.  Yes my car is a 1500 S, but no on going 100% correct…boring!

Past, Present, Future…

Ghost of Christmas Past- This is what the car looked like when I went and checked it out:


Not much to look at but here are some of the good points about this car, fresh pan that was painted in POR15, disc brakes up front, had most of the parts to put it together, virtually rust free body, came with a dual port type 3 1600.

after digging into to it and going through all the parts that came with it I quickly discovered the negatives:

the front and rear aprons are both junk, the front right fender and rear bumper are both junk, the steering column is junk, its missing half of everything or the parts are junk, no title, and the biggest negative was after i got the motor running it had a nasty rod knock

so I went on a buying spree, and I made a very important choice on the powerplant.  I called a local engine builder(his shop is only 3 miles from my house), he told me about how much it will be.  I mentioned that I’m thinking about about a type 4 motor(remember I previously said I had a 914).  He pretty much told me I’m crazy and that he doesn’t want to have any part of it.  He also said he’s the only guy in the houston area whose don’t a type 4 conversion.  I told him I did one to a ’66 split window bus almost 10 years ago and that it was really no big deal, lol.  The challenge was layed out and decision was very clear.  I sold my sport bike and bought a core engine that had a complete FI system still on it for $200.  I sold the hydraulic cam/lifters and the late buse exhaust for $100, so now i’m only into it for $100.

I tore the motor all the way down to inspect it and freshen it up if need be.  It was a good thing that I did too.  both the heads were cracked, one of the cam bearings was fucked, and there was heavy pitting in one of the cylinders.  Still not bad at all since the pistons/crank/case/3 cylinders were all within specs and I got a complete FI setup as well as nearly all the engine tin for $100.

I’m going to take a step back from the engine and get back to the car.  First thing I did was to buy a wire harness from a ’67 since all I had was half a harness.  Turns out that ’67 harness was only half as well.  Luckily it was the half that I needed.  So I combined the two and made a complete harness and wired everything as per the wiring diagram for my car.  Got everything working and then tackled the glass.  After the glass I installed the pan to body seal.  I frogot to mention the body wasn’t even bolted to the pan, made it a bit easier to raise the body 4″ so i could glues the seal down, then lower the body onto it.  I also put brand new smart car tires on it and painted the wheels red(looks alot better then rust).  Its starting to look like a car. 


I got a german key cut for the door locks and I bought the front and rear trunk latches (it was missing both and the rear is notch only so $$$), now I can actually lock the car up, not that there is anything to steal, lol. 

So what I got now is a car that is mostly put back together, all the electrical works, and buying spree on parts for the type 4 engine.  So now I’m in need of a title.  I called the Texas tax office and they have no records of it on file, and there was a CA liscence plate on the rear with a ’92 reg sticker.  Judging from how rust free the body is I wouldn’t be surprised if it is a cali car and it has been parked for the last 20 yrs.  I did a little research and it seemed like international title service would be my answer to the lack of title, they ha not a single bad review.  Wrong!  I paid $270 and had to raise all kinds of hell after 8 months of waiting…WTF!  Also all the guy did was use the webpage for VT DMV to get it registered in my name, I could have done that for $65 and it would have only taken a week.  Live and learn right?  Anyways, I got some sweet 1965 Texas plates off ebay.  Thats the only way to roll 😉

Lets get back to this motor, here is what the long block consists of:

  • GD 2L case (STD/STD) giggity
  • 2L crank (STD) polished and balanced
  • 2L rods balanced
  • 200mm conversion flywheel, balanced (chinese FML!)
  • new clutch disc, reusing the pressure plate from the type 3 motor(looks like its brand new)
  • 73-74 bus heat exchangers(removed all the Al so its just j-tubes now)
  • thunderbird style header w/ O2 bung
  • bugpack muffler
  • Jake Raby 9350 cam and lifters (New)
  • Mahle mains, new rod bearings, new double thrust cam bearings
  • dished bus 2L pistons w/ new rings
  • honed used 94mm cylinders(still in spec)
  • 1.7L heads, bored, new valves, HD single springs, keepers, retainers, seats, guides, hardened rocker studs.
  • chromoly pushrods, modified 1.7L rockers, solid spacers, 911 swivel feet adjusters
  • german gaskets
  • Raby engine hardware kit
  • 30mm oil pump(match ported the case to it), and a new oil pressure relief plunger
  • new rubber mounts for the type 4 engine bar
  • rebuilt alternator, new belt

So $2300 total for the long block and exhaust, that got me a mild 2L with freshly rebuild heads.  Nothing wild but I can vouch for it not being a slouch, it pulls nicely.


Now the fun stuff.  I decided to go with FI, I hate carbs and goal with this build it to go the less traveled path.  Started out just being a simple megasquirt setup for the fuel, that didn’t last very long.  I quickly progressed to a trigger wheel/VR sensor, megasquirt 1 with extra code, and coil on plugs aka distributorless ignition.

So here’s the FI/intake setup:

stock parts-

  • 2L bus injectors (professionally cleaned and flow tested)
  • 2L bus intake runners, TB, and rails/1.8L 914 plenum(they don’t have EGR bullshit)
  • cylinder head temp sender
  • fuel pressure regulator

not stock parts 🙂

  • MS1 w/extra code, bosch coil drivers, and all the rewiring done
  • 5.75″ 36-1 trigger wheel with a 1.5″ hole drilled out the center
  • ford mustang VR sensor
  • ford ranger TPS (I modified the stock TB to accept it, works good)
  • GM IAT sensor mounted on a UNI filter(its for a ATV, lol)
  • 4 GSX-600r COPs, had to use Bosch Miata spark plugs (this is a brilliant setup)
  • Walbro 255lph inline pump, and a universal fi fuel filter
  • AEM wideband O2 sensor(just happen to have one laying around)
  • Wiring harness, terminal strip, crapload of relays, fuses, and wire.
  • misc pigtail connectors for all my goodies


I didn’t get the tester for my megasquirt so I found a few assembly mistakes when i went to fire the engine off for the first time.  Wasted a lot of time but I eventually figured it all out.  The tune isn’t complete but its running pretty.

I was on one of igoogle’s blog things, works fine but i just don’t care for google having all that info about me.  I’m sure this is no better, but as they say “ignorance is bliss”.

My name is Nick and I’m grease monkey.  I’m a full time college student which means i have a lot of free time on my hands.  To keep me busy I have been working on a old Volkswagen, a ’65 notchback to be exact.  This particular vehicle was sold at a dealership in Frankfurt, Germany, so its a real German car.  This particular model was never imported to the US by VW, its a grey market car.  I have always wanted one and when I found this one for sale 4 hours away I knew it was the one, and since I have fallen complete head over heels in love with it.

Since this entry is about me I’ll give a quick background:

Born in California to a German immigrant mother and first generation Serbian father, the very first car I rode in was a ’68 Karmann Ghia.  There was always a VW of some form or another in my family so I was already pre-destined to have a VW for my first car.  It was a ’72 super and I still have many many fond memories of that car.  After 15 yrs of amazing service I retired it properly by taking a sawzall to it and recycling the metal.  If I can’t have then nobody else can.  That was the start of my VW addiction:  ’72 super, ’73 super, ’73 beetle, ’72 squareback, ’62 beetle, ’74 914, ’71 super, and now a ’65 notch.  It hasn’t always been VW’s, I got big into sportbikes for about 5 years, and I even dabbled with a turbo ’06 civic.  One needs to have a open mind to learn new things.

I served 6 years in the US Navy working on electronics for missile systems, got out and was a field service engineer/R&D tech for 4 years, then went back into the US Army and was a forward observer (13F), airborne, for almost 4 years.  Now I’m finishing my BS degree in Criminal Justice.  I’m what you would call a “wire whisperer”.

I think about sums me up, maybe it even sheds some light to the enteries that I’m about to drop on this world.  Buckle in and hang on, its going to be a bumpy ride 😉